Build Your Own Aquarium Stand
Note: This document was created on August 7, 1996. It has not been modified since then, except to update the email address, rearrange the photos, etc...
So you want to build an aquarium stand...
With the plans on this page, you can build your own aquarium stand and save a bundle. I saved more than $200.00 building mine, and I'm still using it today.
These instructions are practically fool-proof. First, take a look at the picture of the stand page to see if this is the "style" of stand that you want. Although the dimensions can be changed, the overall look will remain the same regardless of the size tank you build it for.
Once you're ready to get started, visit the step by step instructions page and print it. Make sure you download the Lotus 1-2-3 spreadsheet while you're there. It takes the effort out of calculating lumber measurements. Also visit the technical drawing page and print it. It'll give you a schematic look at what you'll be building.
And for the perfectionists out there, there's a helpful pictures page. This page has links to some pictures of the detail work. Things like the floor boards and the trim are covered here. These "fine points" can help you add finishing touches that really make your stand look professional.
Helpful Pictures
Here are some miscellaneous pictures to help you see the project through. The pictures are very close-up. They should show you all the detail you need to successfully trim your stand. There are 9 .JPG files that are 40 - 50 K each! If you have a slow connection, be prepared to wait.
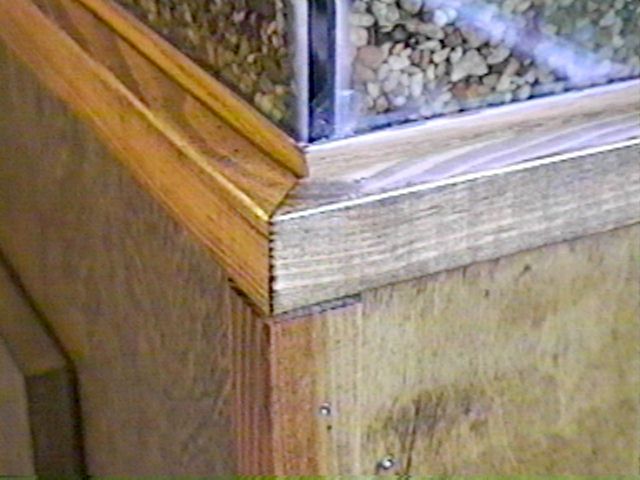 Front Corner -- Here's the detail of one of the front corners. Notice the 45 degree angle cuts on the moulding. This isn't mandatory. You could get by with just straight cuts if need be.
 Back Corner -- This is the back corner. I just let the trim run back and stop. No extra work for me!
Bottom Corner -- And here's the bottom trim. Very little extra work. This is how you can do the top trim (with moulding, not 1x4's).
 Inside Door -- Here's the inside of the door.
Doors Open -- This is what my stand looks like with the doors open. Hopefully, this picture will help with cutting out the door holes.
 Floor On -- Putting the inside floor in can be tricky. I decided to cut my floor board into pieces (and leave them loose) so I could put my power strip underneath.
Floor Off -- This shows the floor board removed.
Hinge Outside -- Last but not least, putting the hinges on. Here they are from the outside.
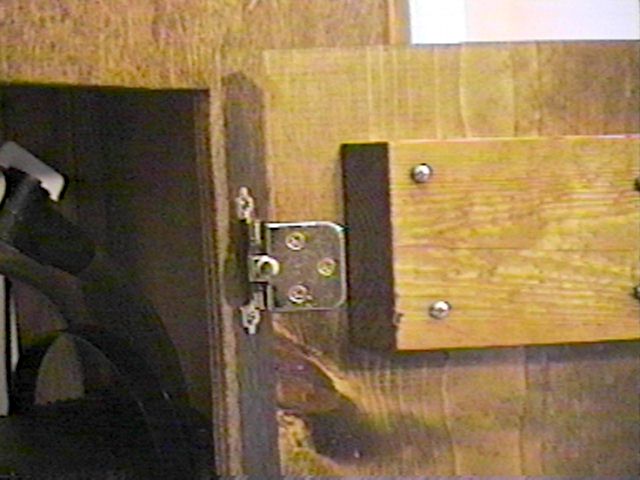 Hinge Inside -- and from the inside.
Well, I guess that about wraps it up. Hope it doesn't take too long to drag these across the net. Let me know if I can help!
DISCLAIMER
The information contained within this document is provided free of charge. Since the skill level of those who use this document may vary (as well as their national language), I have written it to be as simple to understand as possible. However, since woodwork has it's own lingo, I can't avoid some terms. If you need clarification, you can e-mail me, but it's probably better to ask a local pro or a friend for advice.
If you feel that this document needs improvement in clarity, content, word choice, grammar, etc., please e-mail me with your suggestions. This is an evolving document, and everyone's ideas are important. I can be reached at chris@thefreyers.net.
OVERVIEW
The lumber used in my design was standard, construction-quality 2x4's. These are available at most hardware stores and building centers for a minimal cost. I recommend using screws instead of nails for joining wood because screws will hold even if the wood gives over time, plus they can be removed if needed.
In building the stand, you will construct two square frames: one which the tank will rest on, and one which will be on the floor. The frames will be connected with 2x4's in each corner, plus 2 in the center, just for support. You will then cover the frame with plywood, cut out holes for doors, build the doors, put the trim on, stain everything, and put the doors and accessories on.
Part 1 - Using the Spreadsheet
Download the Lotus 1-2-3 spreadsheet right here (MS Excel here).
We need to develop some exact measurements for your stand. I'll explain the principles behind the design, and then you can put values into your spreadsheet. Hang on, here we go!
In order for the stand to hold a tank firmly, the tank must not rest on the outside edges of the stand. For example, if your tank is 48 x 12, don't make the stand 48 x 12 also. Add a little extra for 'play'. I made my stand 48.5 x 12.5. This gives me a quarter-inch gap all the way around my stand.
On the spreadsheet:
| Tank Width | 48 |
| Tank front-to-back | 12 |
| Height from Floor | 30 |
| Gap | 0.25 |
If you want to cover the plastic rim around the bottom of your tank, you need to add that measurement to the plywood you'll be cutting. My tank has a 1.5 inch rim, so I used a 1 inch edge height.
On the spreadsheet:
| Edge Height | 1 |
In order for the spreadsheet to determine the lengths of lumber you need, you need to tell it *exactly* how wide and thick your lumber is (to the nearest eighth inch is good). I used 2x4's that were 1.5 x 3.5 (they were sanded - most 2x4's are 1.675 x 3.675). Also enter the thickness of the plywood you'll use. I used 3/8 inch. Quarter inch is OK if you can find a quality piece.
On the spreadsheet:
| Short Lumber Dimension | 1.5 |
| Long Lumber Dimension | 3.5 |
| Plywood Thickness | 0.375 |
At this point, your spreadsheet should have calculated the remaining values for you. The first section shows you what the outside dimensions of your stand will be, with plywood added. The second section is a lumber list. It's minimal in most cases. The third section is a plywood list. This is where you can really spend some money. Depending on the type of wood and the size of your tank, your cost may go anywhere from $15 to $100. The only thing I recommend is that you use quarter-inch or 3/8 inch thick, and that you buy something pre-smoothed or sanded. You can spend weeks sanding wood to perfection!
PART 2 - BUYING THE MATERIALS
Print the spreadsheet and take it with you to the hardware store. The important thing here is to save money by reducing waste. You can do this by organizing your required pieces of wood (on paper) to use the fewest pieces of lumber possible. 2x4's are available in 4, 8, 10, 12, and 16 foot lengths in the USA. In my case, I only needed four 2x4's that were each 8 feet long. Plywood is available in 4x8 (and sometimes 4x4 or 4x2) foot sheets. Organizing the plywood pieces onto the sheet is like doing a jigsaw puzzle.
| Feb. 8, 1998 Authors Note: |
|---|
| There's a piece of software called Sheet Layout for Windows that might help you with the plywood layout. I'm not endorsing it. It just looks particularly appropriate for this task. |
Whether or not you get assistance in the store, YOU NEED TO MAKE SURE YOUR LUMBER IS STRAIGHT!!! It doesn't really matter for construction purposes, but it does here. Just look down the piece of wood as if it were a gun (one end on the floor, the other at your eye), and make sure it doesn't twist or bend. If it does, get another piece. Don't be shy about this.
I have a variety of tools to work with, So I used what's easiest for me. In addition to wood, I used these during construction: 3 inch wood screws, nails (2 inch and 1 inch), a phillips head screwdriver bit, a set of drill bits, a carpenter's square, a Measuring Tape, 4 Cabinet Hinges, 2 Cabinet Handles, my drill, my jigsaw, and my radial arm saw (you don't need one) a 4-foot metal straight edge, and 2 C- clamps.
PART 3 - BUILDING THE FRAME
The first thing to do is cut your 2x4's into the correct length pieces. Don't cut the plywood now. A word of caution: never assume that the end of a 2x4 is a perfect 90 degree angle. Check it. If it isn't, make a new cut.
When you're finished, put all of the same-sized pieces together and check the length. You may need to do some touch-up.
Find a flat surface like a garage floor. Place 2 of the long beams on the floor parallel to each other. Make sure that their "short dimension" is flat on the ground as shown in the technical drawing. Then place 3 of the lateral beams (the same way) between the long beams; one at each end, and one in the middle. Note that the lateral beams don't extend past the end of the long beams. Put 2 screws into each joint from the outside of the long beams into the lateral beams.
NOTES!!
Make sure your beams form a 90 degree angle before applying screws.
Make sure that your 2x4's are squarely touching the floor when applying screws.
When finished, write the word "outside" on the surface that's touching the floor. It will become either the surface the tank rests on or the bottom of the stand.
Repeat the above procedure to build another assembly.
Now, place the two assemblies side-by-side on the floor. Stand them up such that their long edge is lying on the ground and the "outside" surfaces are facing away from each other. You are going to install the vertical beams between the two assemblies.
NOTE:
Be sure to view the technical drawing for orientation of the beams--this helps evenly distribute the weight of your tank.
Here's the tricky part. Since your screws aren't long enough to pass all the way through the 2x4's, you can either angle them in (from the side), or countersink the holes (from the top) so that the screws can reach into the vertical beam. I recommend countersinking--there's less chance your wood will split. Make sure everything is square, attach all six vertical beams, and you're done building the frame.
PART 4 - COVERING THE FRAME
Before cutting anything, measure the actual dimensions of your frame, and adjust the values in your spreadsheet if necessary (or adjust your lumber and reassemble until you match the spreadsheet).
Always cut the front panel first--it's the largest. If you make a mistake, you can re-cut it to become a side piece. Mark and cut the front panel from the dimensions in the spreadsheet. Hold it against the frame, and inspect for straightness. I used the edge that I cut as the bottom, because I knew it was perfectly straight and square. Tack the panel on by putting a couple nails halfway in, just to hold it to the frame.
Next, cut out the two side panels. This is where you can overcome any shortcomings in the front panel. You can alter the dimensions of the side panel to fill in any gaps from the front (maybe you cut the front too short?). Tack the side panels on. Check the fit, check the stand for squareness (does it rock? is it level?), refit as needed, and finish nailing the panels on. I put nails about 1 foot apart. The stand should be rock solid at this point.
Cut out the shelf boards. The one for the top should be fitted so there is almost no gap between it and the plywood. Sink all nails below the wood surface (we don't want to damage the tank!). The one for the bottom can be ugly. No one's going to see it but you. You'll have to cut notches in it for it to fit around the vertical beams.
Build two doors. I did this with two 20-inch pieces of 1x8, side by side, held together with two 1x2 strips on the inside. You can use plywood, but I wanted something thicker.
Place the doors on the stand where you want them to go, and mark the section of wood you'll cut out. Leave at least 1 inch all around for the door to close onto. Look at your kitchen cabinets for a good example. To cut the wood, I recommend using a jigsaw and a metal straight edge with clamps. Drill a starter hole for the saw near a corner, and go from there. Don't worry if it's not perfect--no one will see it.
PART 5 -- ADDING THE TRIM
Now for the part that really ties things together--the trim. Start with the bottom trim. Cut a 1x4 into 3 pieces: one for the front and two for the sides. Do the side pieces first, and make them the same length as the stand (front to back). Tack them on. Then cut the front piece so that it covers the ends of the side pieces. Adjust as necessary and nail in. Tip: nail these boards in good--they'll take a lot of abuse if you ever move the stand.
Next, do the top trim. It's purpose is to cover up the ugly plywood edge at the top. Your hardware store may have decorative trim available to do the job, but mine didn't. I bought standard 1" outside corner molding.
This is another tricky part. If you're using corner molding, you'll probably have to rip-cut (meaning "cut long ways") one side of the corner molding so it doesn't extend past the plywood (toward the tank). I used a radial arm saw. You may need to have someone do this for you if you don't have the tools.
Angle-cut one end of a trim section, and place it on the stand. Over-estimate the length of the other end by a half inch or so, and angle-cut the other end the opposite way (we're cutting angles similar to those on a picture frame). Then, angle-cut the two side pieces, leaving extra length on the back edge (we'll cut it off later). Work on getting the front piece the right length by cutting and refitting it against the two side pieces. When the length is just right, tack the front piece on.
NOTE:
You should drill holes in the trim for the nails (so they don't split the wood)!!
Follow the same procedure to shorten up the back end of each of the side pieces. Finish up by applying additional nails where needed (remember to drill first).
Last, apply trim to the vertical edges. The trim you use will be determined by the size of the gaps present. Just cut it to the correct length, and nail it on as before. You may choose not to put trim along the back vertical edges. I did--it looks more professional.
PART 6 -- STAIN AND ACCESSORIES
Now for the stain. Darker stains are better at hiding imperfections and scratches. Most hardware stores have stain samples you can see. Make sure you see the stain on the type of wood you have because all wood absorbs stain differently. I recommend the use of poly-stains. They are 2-in-1 products that contains stain and polyurethane (a protective plastic) in the same can.
Stain your stand and let it dry according to the directions. Don't' forget the doors. I stained the inside of the doors, but not the inside of the stand. Most people get excited at this stage and want to rush.
DO NOT HURRY HERE!!
You could ruin the appearance of your stand if you don't follow the directions.
In my experience, it takes a day or two longer for the stain to dry than the directions say. When in doubt, let it dry for another 24 hours. A fan will help it dry faster, but you must make sure than no sawdust or other material will be blown onto the stand.
When the stain is dry, it's time to put on the hinges. The hinges should be able to mount on top of the wood, and should attach to the door from the inside. Some kitchen cabinet doors are this way.
Attach the hinges to the doors according to the directions (all hinges are different). Lay the stand down so the door holes face upward. Lay the doors where you want them to go, and secure the hinges to the stand.
Attach door handles (if desired) in the same manner as the hinges, and you're done! Voila!
PART 7 -- WHAT NOW?
Well don't just stand there, get movin'! Here are some tips I can offer you since I've been using my stand.
- I put a 'hospital tank' (a small 10-gal tank) inside my stand. It fits perfectly in one side. But I had to put it in from the back before I filled the big tank because my doors are too small. So much for ever getting it out!
- On a 55 gallon tank, you should be using a canister filter. :-) Mine fits in the bottom right-hand side, and all my tubing is held out of the way with rubber bands and hooks screwed into the frame. I also have a UV filter which is held above the 10-gal tank with string and hooks.
- I didn't nail the bottom shelf board in. Instead, I cut it in half, put the left half in, cut the right piece in half (making 2 'quarters'), and cut a big notch away from each of those pieces. This way, I can run all my power cords to a power strip underneath, and still have room for my 'stuff' inside the cabinet. I can also get to the power cords without having to remove everything.
- I bought a 5-gallon paint bucket (new, of course). It fits right next to my filter, and I keep all my supplies in it. I can get to my power plugs or filter in seconds by pulling the bucket out. It's also nice when cleaning the tank (holding fish, water changes, etc...).
THE END
Well, I guess that's it! Remember: Always wear your safety gogles. Don't cut toward yourself. Don't be in a hurry. Never use a nail twice. Drinking and power tools don't mix. Fix problems when you find them. And don't neglect your family. Have fun! And e-mail me a picture when you're done.